
Nail Forms
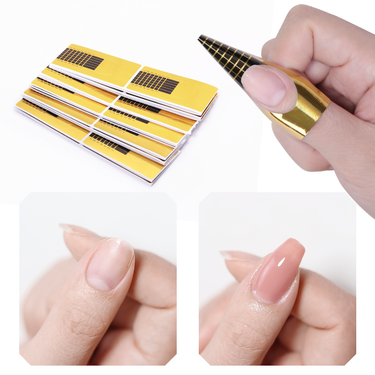
Acrylic Nail Form Tips Nail Art Extension Paper Holder Tools Nail Sticker Polish Gel Nail Art Foils Guide for Manicure Tools

"Nail Art Extension Tips - 120 Ballet Style Square Tips With Full Adhesive Stickers"

2Pc Silicone Toe Separator Fingers Feet Toe Spreader Hallux Valgus Bunion Corrector Toe Straightener Corrector Finger Separators

150pcs Shape Sandwich Nail Forms Natural Clear No-Trace Nail Art Tips With Auxiliary Line Almond Shape Nail Tips

100pcs False Nails Press On Nails Acrylic Extension Coffin Forms Nail Tips

Dual Nail Forms False Tips For Gel Extension Quick Building French Line Guides Silicone Pad Nail Mold Reusable Manicure Tools

Good Nail Patches Nails Ornaments Removable Plastic Decorative

140Pcs/box French Nail Dual Forms Nail Extension Molds Extended Nail Plate French Manicure Tools

120PCS/Box Nail Art UV Extention Gel Nail Extension Tool Quick Building Nail Mold Tips Nail Dual Forms Finger Extension ZH

120Pcs Dual Forms Finger Top Forms For False Nail Art Tips Upper Form For Poly Nail Gel Extension Building Mold Nail Forms

150 Pcs Dual Forms For Poly Nail Gel Soft Nail Forms Molds Acrylic Full Cover False Nail Tips Manicure Extension

120-Piece Clear Crystal Nail Extension Tips With Scale-Free Forms

Decorative Nails Tips Graduated Quick Building Transparent Clear Quick Mold Dual Forms Finger Art Tips

Quick Building Mold Tips Nail Extension Gel False Nail Dual Forms Finger Extension Tool

120Pcs Poly Nail Gel Nail Dual Forms Finger Extension Uv Builder Nail Tips Tools
The Secret to Flawless Nail Extensions: A Foolproof Application Routine
There is a moment of pure frustration that every DIY nail artist knows. You have carefully applied your builder gel, shaped the apex, and are ready to cure. But the gel is pooling, the shape is uneven, and you cannot seem to get that perfect, natural-looking extension. The struggle is real, but the solution is surprisingly simple. It comes in the form of a tiny, curved sticker called a nail form. This unassuming little tool is the single most effective way to achieve salon-quality nail extensions at home.
The Perfect Foundation: Positioning Your Form
The key to any successful nail extension is the form. It is the scaffolding upon which you build your new nail. The secret lies in the placement. Align the curved edge of the form with the underside of your free edge, ensuring it sits snugly against your fingertip without any gaps. This single, precise placement determines the entire shape and length of your finished nail. For the best tools to complement this step, explore the Nail Tools category for precision implements.
Shaping the Extension: From Form to Flawless
With your form securely in place, the real magic begins. Using a nail brush dampened with a little cleanser, gently pat and drag the gel towards the tip of the form, shaping it into the desired length and curve. Once you are happy with the shape, cure under your UV lamp. A quality set of Nail Brushes is essential for achieving smooth, even application.
The Reveal: Removing the Form for a Perfect Finish
The most satisfying moment in the entire process is peeling away the form. After curing, gently lift the edge and peel it away, revealing a perfectly shaped nail extension beneath. The entire process takes less than ten minutes per nail. To complete your setup, a reliable Nail Dryers will ensure each layer cures perfectly and quickly.